Autorotations
When a helicopter engine stops producing power in flight, helicopter crew (and passengers!) have demonstrated a strong preference for strategies which do not involve plummeting uncontrollably toward the earth. Contrary to popular belief, such a strategy exists: the autorotation.
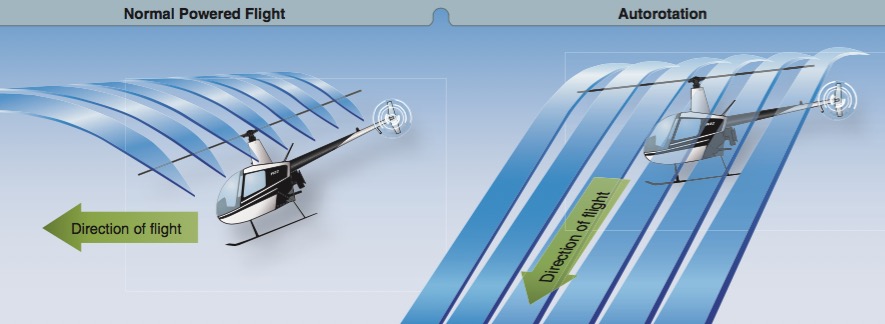
Simply stated, an autorotation is a maneuver which allows wind from below a descending helicopter to drive the rotor blades, which (if done correctly) produce sufficient lift to carry us safely back to the ground.
Good reasons to autorotate a helicopter
- Loss of engine power
- Loss of tail rotor
- Main rotor transmission drive belt failure
- Fire / smoke
- Checkrides and flight reviews!
Clutch Disengagement
The first thing that happens is the freewheeling unit disengages the engine from the main rotor transmission. It does so via a variety of mechanical means. One of these is depicted below.
Here the clutch is engaged, the centrifugal force from the engine output holds the inner and outer clutch together via a series of mechanical rollers. This allows the engine to drive the main rotor transmission through a series of subsequent gears.
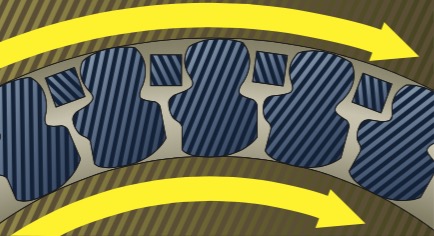
Now we have lost engine power (bad day). This allows the rollers to disengage and the outer portion of the clutch (main rotor driving portion) to turn freely.

The pilot must now immediately lower the collective to maintain rotor RPM and begin an autorotative descent. This allows the wind to drive the main rotor system from below.
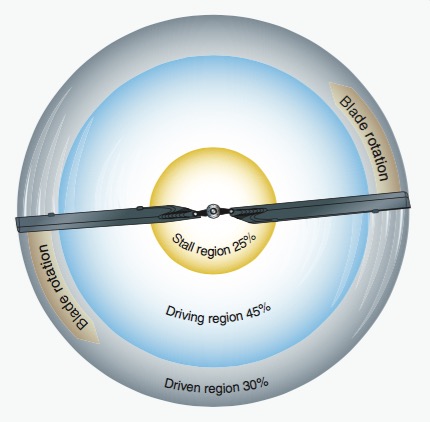
The aerodynamics of the relative wind driving the blade are largely affected by main rotor blade twist and the pilot manipulating the controls. In general, the portion of the blade which drives the rotor RPM is only a portion of the rotor disc.
Performing an Autorotation
The exact actions taken to enter an autorotation due to torque and other aerodynamic effects in a helicopter with counterclockwise rotating MRB are:
- Lower collective all the way
- Right pedal to stay in trim
- Aft cyclic (just enough to keep ship level)
- Attitude - When entering a practice autorotation the attitude before the auto and after you enter should be identical
- RPM (rotor) - If necessary, a slight pull on collective to prevent main rotor overspeed
- Attitude - Now maintain a 65 knot attitude all the way to the flare
The pilot must wait and visually verify the collective pull is necessary before doing so. At light weights, the rotor RPM may not build at all, and pulling on the collective may stall the main rotor blades, which causes the helicopter to immediately stop flying. Do not mechanically pull the collective out of habit to avoid this!
Once the collective is set appropriately on entry, you should not have to touch it again until landing. Doing so will only cause your perfectly set up auto to get out of whack, leading you to chase a variety of parameters while hurtling to the ground at 1700 feet per minute. Leave the collective alone, and concentrate on maintaining the attitude of the helicopter by looking outside.
At this point, about 90% of your focus should be outside to keep the helicopter attitude as appropriate and make your landing spot. If you keep the attitude the same, you can occasionally look inside at your gauges to verify airspeed and rotor RPM.
With your focus outside the helicopter, it is now time to make your way towards a safe landing spot. Three possibilities exist here:
- Your spot is perfectly positioned ahead of you.
- Your spot is too close
- Your spot is too far
Straight Ahead
In the case it's right in front of you, party on, Garth! Just keep the attitude for your desired airspeed and as you approach the ground, execute a cyclic flare to slow the rate of descent and forward airspeed. Once slow enough, level the ship and pull the collective all the way up to cushion your landing. Now, change your shorts.
Help, It's Too Close!
If the spot is too close, you need to maneuver the helicopter so that you can waste some of your excess altitude. You can do so using the following techniques:
- S-turns
- Slow down (note you'll have to speed back up before the flare)
- Slip the helicopter (kick it out of trim)
- Increase the rotor RPM
None of those things involves manipulating the collective. Once you establish an appropriate angle for the desired spot, simply put the helicopter back into the original entry attitude and both your airspeed and rotor RPM will magically come back where you started. Flare, level, pull collective, and land.
Help, It's Too Far!
Well, in this case, you have fewer options. This is why you should be flying at safe (read: higher) altitudes.
- Increase airspeed
- Lower rotor RPM
Max Glide in a Robinson R22: 75 KIAS / 90% RRPM
Max Gliade in a Robinson R44: 90 KIAS / 90% RRPM
Setting that up takes some practice, and in a Robinson you'll have to listen to that infernal low RPM warning horn the whole time, but it's your only chance of making your spot. It does make a significant difference in glide distance though.
As you can see, you have many more options being too high than too low. Don't be that guy or gal skimming tree tops at 100 AGL. Fly safely at a minimum of 1,000 AGL or higher as necessary.
To recap, your autorotation entry should always begin and end the same (airspeed, attitude, RRPM). It's that middle portion where you have the latitude to due what is necessary to make your spot. Plan to reset back to your entry attitude, etc by 100 AGL to give yourself plenty of time to set up the cyclic flare and landing.