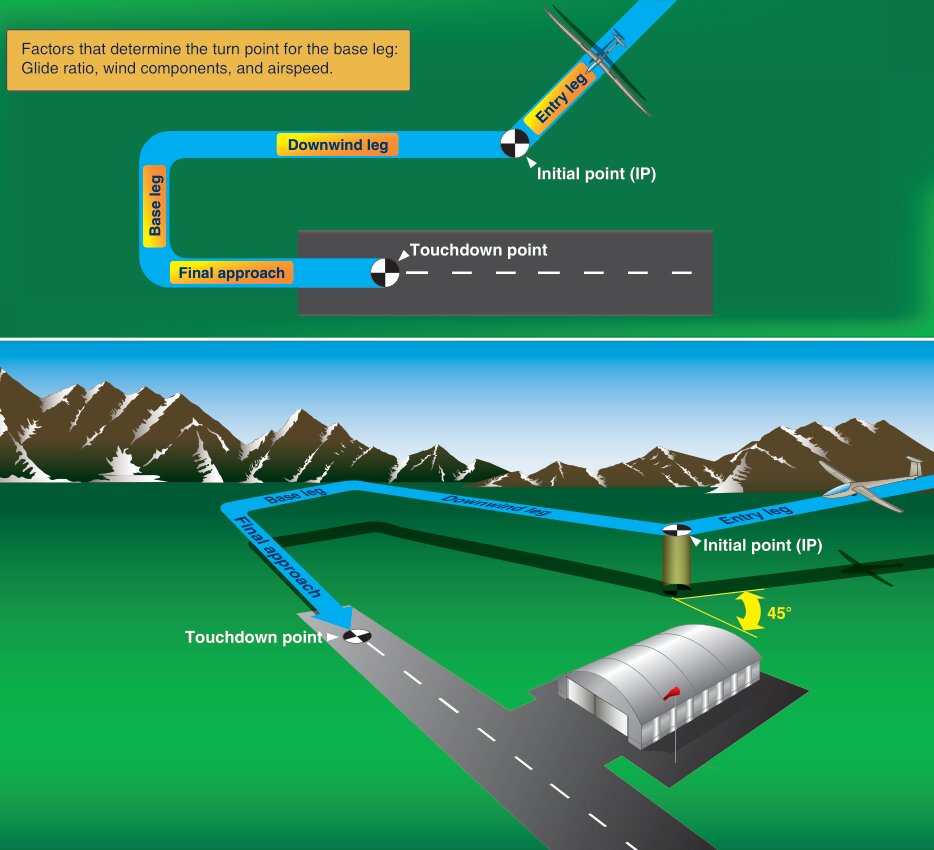
Pattern Work
Once you are comfortable with slow flight, stalls, and the aerotow, it's time to work on entering the pattern and landing the glider.
We want to enter the pattern at a 45° angle to the runway. This image shows it to the mid-point of the runway, but typically we will enter nearer to the end of the runway we are not landing on. You'll see below.
Once established on the downwind leg of the pattern, begin your pre-landing checklist as prescribed by your glider's manufacturer. Things like airspeed, landing gear, flaps, a radio call, etc.
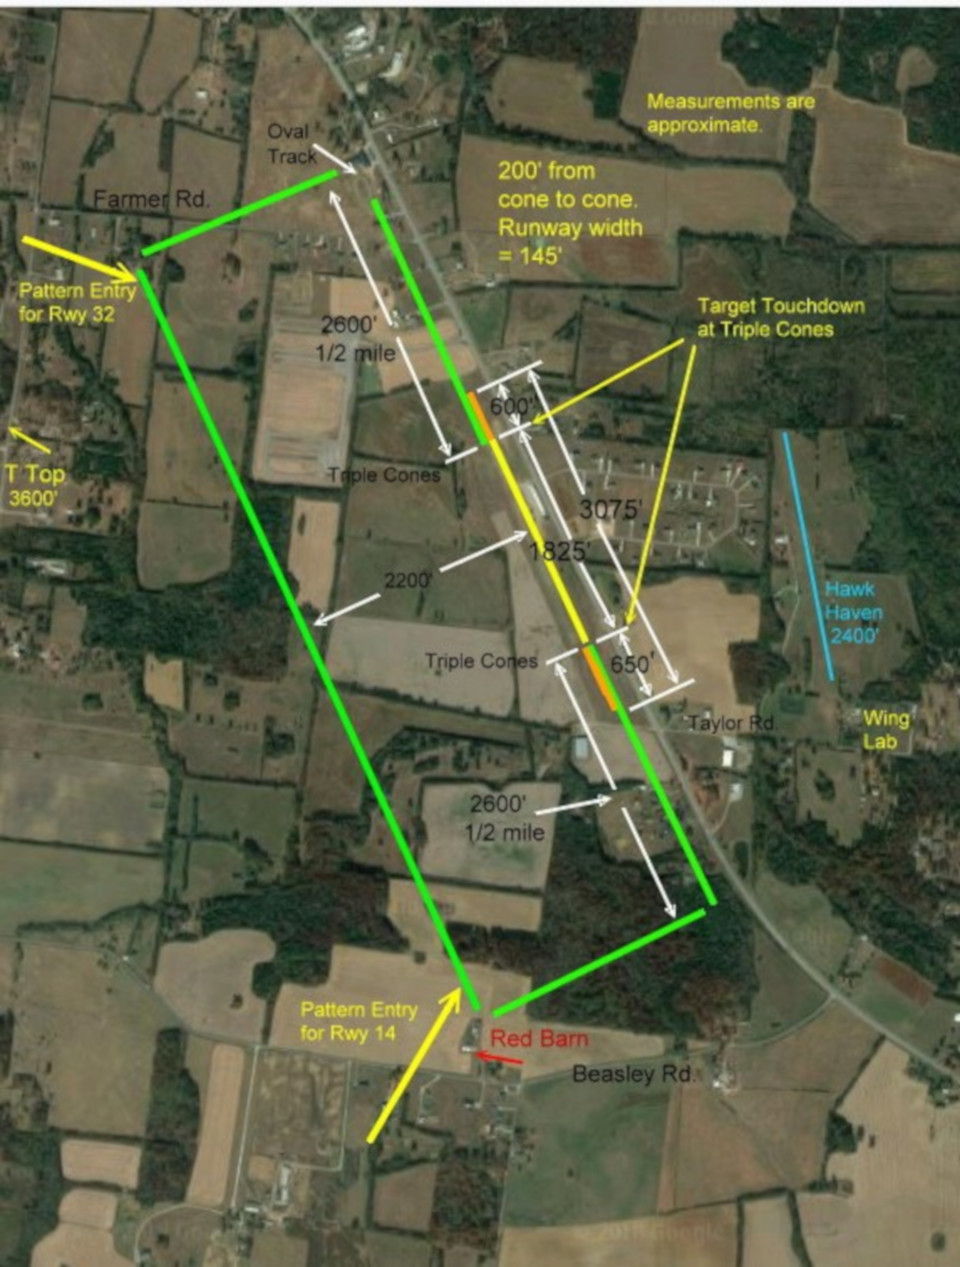
Eagleville Specific Pattern
Below you will find a wonderful aerial pattern illustration made by CFI-G Tom Fleming. It shows the Eagleville Puckett (50M) runways 14 and 32 in yellow. The green lines to the left above, below, and to the left of the yellow runway line are the legs of the pattern.
NOTE:Runway 14 uses a left traffic pattern, while runway 32 uses a right traffic pattern at Puckett Field.
We want to enter the pattern at 1,000 AGL, or about 1,800 MSL on your altimeter. Then do your landing checklist as printed on the panel of your glider.
When you area abeam (lateral to) the end of the runway you are landing on, engage the spoilers about 1/3 to 1/2 of their travel. We will then continue to use them as needed to make our intended touchdown point - retracting if we need more glide, and extending if we need less, all the way down to the landing.
Many students ask, when do we turn base? The best answer to that is to look back at the runway as you are flying past the end of it on downwind, and judge when you are at approximately a 45° angle back to the end of the runway you are landing on.
For example, if landing on runway 32, look at where the label for the Red Barn is. Mentally draw a line from that corner of the pattern to the end of runway 32. The angle formed between the base leg and the line you mentally drew is about 45°. But my advise is not to use the red barn specifically, but use it initially to help you memorize how 45° angle should appear and then use that on future landings.
Landing
To land your glider, as simply as I can state it, you will try to do the following 3 steps:
1. Maintain your target airspeed (60 knots in the ASK21) on final approach
2. Fix an intended target on the runway (triple cones at Puckett is a good one) and use pitch and spoilers in conjunction to maintain that target in the middle of your windshield down to about 10 feet off the ground.
If the target gets too high in the windshield, you are too low. Retract spoilers and use the stick to get it back in the middle of the windshield. If the target is too low in your windshield, you are too high and should extend spoilers. Continue this process all the way down.
3. When you are about 10 feet above the ground, use the stick to level the glider off parallel to the surface of the runway as you continue drifting down to about 3 feet above the ground.
4. At this point, the glider is losing airspeed and drifting toward the surface of the runway. You should use the stick to gentle hold the glider OFF the ground. In other words, use aft stick to try to keep the glider from touching the runway, but do so gently to avoid ballooning up, pilot induced oscillations, etc.
5. As the glider reaches the intended landing pitch attitude, hold that attitude until touch down.
6. When the glider touches down, immediately apply FULL spoilers and forward stick to keep it from launching back into the air.